
 Seeing Monitors
 Antique Telescope
SM-1 Essential Device
The SBS Seeing Monitor:
An Essential Device for your Home Observatory
by Alan Holmes
Santa Barbara Scientifics new seeing monitor is an essential piece of equipment for the serious amateur astro-photographer, based on my experience. I was one of the original founders of SBIG, and president of the company for around 20 years, so I had many, many evenings when I needed to try out a new camera or AO device, test a new concept, or check out a camera that had come back for repair with mysterious problems. Also, here in Santa Barbara at least 80% of our nights are clear, sometimes getting a two week stretch of nothing but clear nights. So, I was outside a lot! Our normal clear weather here comes in two varieties, a bit strange compared to most locales since we live in a five mile wide stretch between the cold Pacific Ocean and a coastal mountain range separating us from inland deserts. First of all, we have the nights when the breeze is off the ocean, the telescope dripping with moisture from the dew, and the fog lurking just offshore, waiting to come in just when you have your object centered and focused. The second type of night is when the Santa Ana winds are blowing off the mountains, which fan those Southern California wildfires that often make the news. Those nights are beautifully clear, and the seeing, characterized by the Full Width Half Maximum of a star, measures around 15 arcseconds. The stars look like planets, wildly boiling. So, that is my choice: shut down by the fog at 9PM or 15 arcsecond seeing. However, occasionally we will get a transition period when conditions actually get pretty good. I have achieved images with 1.4 arcsecond stars using a Celestron 11 on one occasion. Those nights are hard to predict!
My observatory is a converted rabbit hutch left in place by the previous homeowner, modified to a roll-off roof. I am lucky to have a place to leave my equipment set up. Still, it takes about 20 minutes to get tracking and focused on a desired object at the beginning of the evening, and about 10 minutes to shut down at night. So, an imaging session has 30 minutes of overhead each night. Also, I would often find myself sitting outside at 11PM, wondering if I stayed up until 4AM if the seeing would get really good, but too tired to do the experiment. And, like most of you, I needed to work the next day. If the seeing was going to be spectacular, I would be willing to stay up. It was nights like this that I realized I needed a seeing monitor. If the seeing was bad, I would use the CCD camera being tested with a small refractor, and go for wide field objects. I f it looked like it might be good, I would use my long focus Celestron SCT. If it looked like the fog was coming in early, I would simply watch TV and drink beer, rather than waste my time. However, the really good nights were when the fog didn’t come in until late, so, it was hard to predict.
The utility of the seeing monitor is several-fold. First of all, it allows you to get some history on your local conditions. Does the seeing really get good at 4AM? Figure One shows a night at my house that started out bad but got pretty good (using an older prototype version of the software). The axis to the left is seeing in arc-seconds, and the horizontal axis is time. Five arc-second seeing is no prize but 1 arc-second is quite rare.

Figure One: Seeing sometimes gets good quite late! (Time in GMT)
Figure Two shows another example, a graph from the software of a prototype of the seeing monitor with an embedded computer. Sky transparency is graphed along with seeing. Both are good to know.

Figure Two: A bad night that improved to so-so
You learn to predict what will happen after gathering many nights of data. Secondly, a good night is quickly recognized. I used to just look at the rapidity of the twinkling of the stars to guess the conditions. However, on the really bad (but very clear) nights they are twinkling at 100 times a second, and actually look steady! The third advantage is a bit more subtle – you get an independent measure of the seeing uncorrupted by the performance of your telescope. For example, on those nights with lots of dew most users simply turn their corrector plate heaters up higher and soldier on. Those heaters are dumping 10 to 20 watts of heat into the front of your telescope, while the center of the corrector plate stays cold. What do those tube currents do to your seeing? Also, if you are capturing unfiltered images with your CCD camera, as many users do in LRGB imaging, does your telescope have a focus shift in the near infrared, from 700 to 900 nm wavelength, that is producing soft stellar images? In other words, perhaps your telescope is better than you think, and you have tube currents, or it’s not better than you think. Either way, for the best results outside you need to know.
It is worth expounding on this point a bit more. I have spent many hours of my life outside testing and troubleshooting three generations of SBIG’s adaptive optic (AO) tip/tilt guiders. I always struggled to get the images I expected. I had nights when I could visually separate 1.5 arc-second doubles through an eyepiece, but invariably, even with an AO running well, seemed to end up with around 2 arc-second FWHM images. Looking back on this experience, I am almost sure the telescope/mount performance was putting a floor under the AO improvement. At the arc-second level it’s not just optical performance: its control of tube currents, control of mount rumble, hysteresis when the mount changes direction while guiding, an accurate initial focus, focus shifts with temperature, etc. Everything has to be perfect! The attention to detail is what separates quality results from mediocre. Figure Three shows two images that illustrate what a 18% difference in FWHM produces. The original of the Bubble nebula(on the left) is a five minute exposure captured using a 20 inch RC telescope on a good night, and the image on the right produced by digitally smoothing the original image. The 17% FWHM difference is obvious – one looks fuzzy. I guarantee a 1.5 arc-second image would make the leftmost one look fuzzy also.

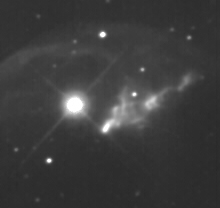
Figure Three: 1.8 arc-sec FWHM compared to 2.1 arc-sec FWHM
By the way, everyone has these problems. You have probably seen many beautiful CCD images in the magazines. Take a little time to inspect them carefully when you see them in the future. Note that, by and large, they are wide field images covering 10 degrees of sky or more. Why don’t you see as many narrow field images? Quite simply, seeing and telescope image quality problems, such as holding a good focus for hours, make narrow field much harder. However, the sky has more small objects than large ones, so there is still much opportunity to capture the best image of an object that has ever been done. It just won’t be the Orion Nebula! CCD imaging hasn’t run out of objects – it has run out of EASY objects. DSLR cameras work great at F/5, which is another reason one might think Astro-CCD cameras no longer have their place, but see how well they do at F/11. Below I show a stack of three 30 minute H-alpha images captured with a ST-8300 at F/11 using a C14 (from my back yard 180 feet above sea level). After the slight sharpening I applied the stars in this image have around 1 arc-second FWHM. You need to know when your nights will allow results like this!